Quick Start
This guide walks you through the fastest way to get Pricing Analyser working in a useful, practical way.
The aim is not to configure everything at once. It is to get the plugin set up, create a small number of sensible rules, and start reviewing recommendations with confidence. So if you’ve not done so already, follow the Installation guide now.
Step 1: Enable boundary pricing if required
Go to WooCommerce → Settings → Pricing Analyser.
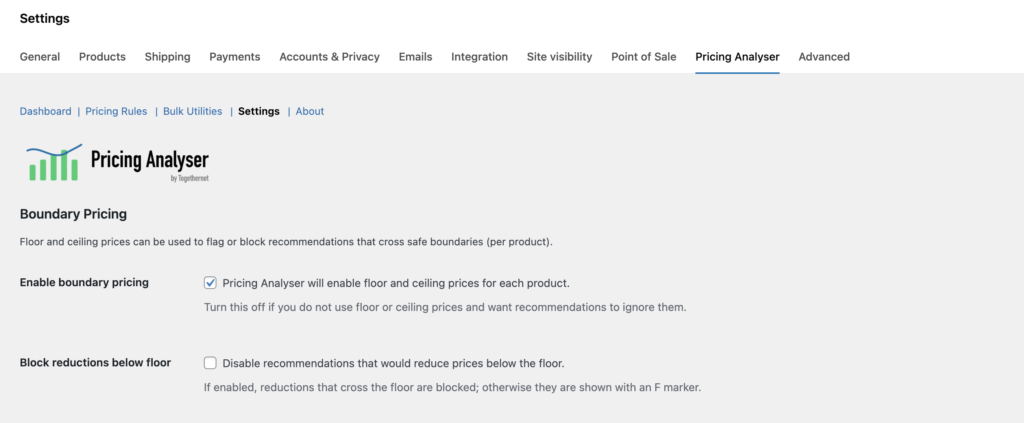
Decide if you wish to use floor and ceiling prices. As this is the Quick Start guide, it’s fine to leave boundary pricing disabled, and return to it later, but it’s a powerful feature you are sure to find useful at some point. Floor and ceiling prices are especially handy if you want to protect margins or avoid accidental overpricing. If you also want pricing recommendations to stay above the product’s floor price, enable ‘Block reductions below floor’ as well. Likewise if you don’t want recommendations to take prices over a set per-product ceiling then enable ‘Block increases above ceiling’.
Enable ‘Use floor prices to calculate margins’ if you want to see margin estimates in the daily briefing and show margin % in recommendations.
If you decide to enable boundary pricing on some products then you’ll also need to set your floor and/or ceilings on those products. You can do this:
- on the product edit screen, in the Pricing Analyser panel
- or in bulk using the Bulk Utilities tools
Step 2: Create a small number of pricing rules
Go to the Pricing Rules section of Pricing Analyser.
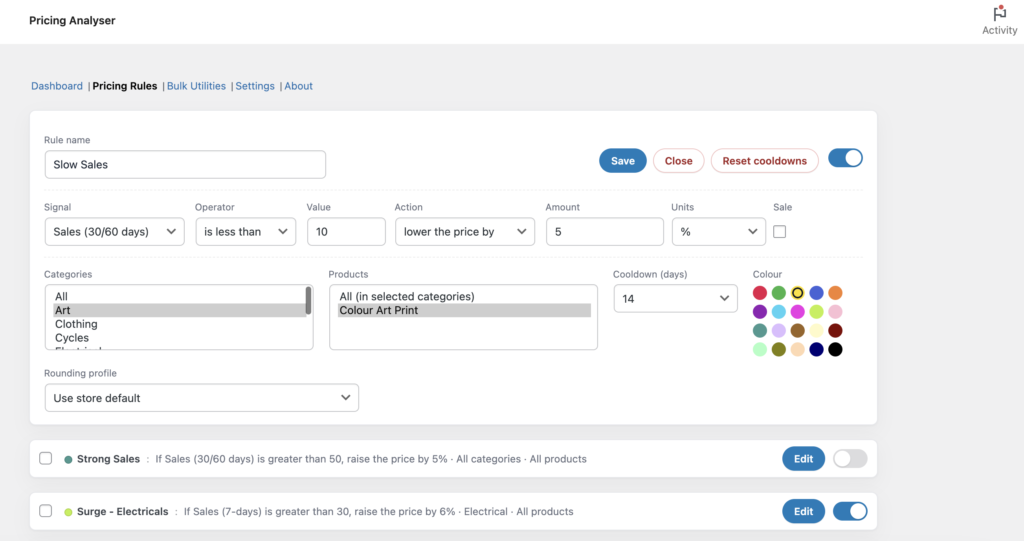
You’ll see some default pricing rules – we suggest you study them, and then delete them so you start with a clean sheet tailored to your store.
Initially, create two or three simple rules. For example:
- if sales are strong, raise the price slightly
- if conversion rate is weak, reduce the price
- if stock is low, raise the price
- if recent sales are falling, reduce the price
Avoid creating too many rules at once. A small number of clear rules is much easier to review and tune. Scope your rules to the categories or products they apply to, to keep recommendations focused.
Step 4: Open the dashboard
Go to WooCommerce → Analytics → Pricing Analyser.
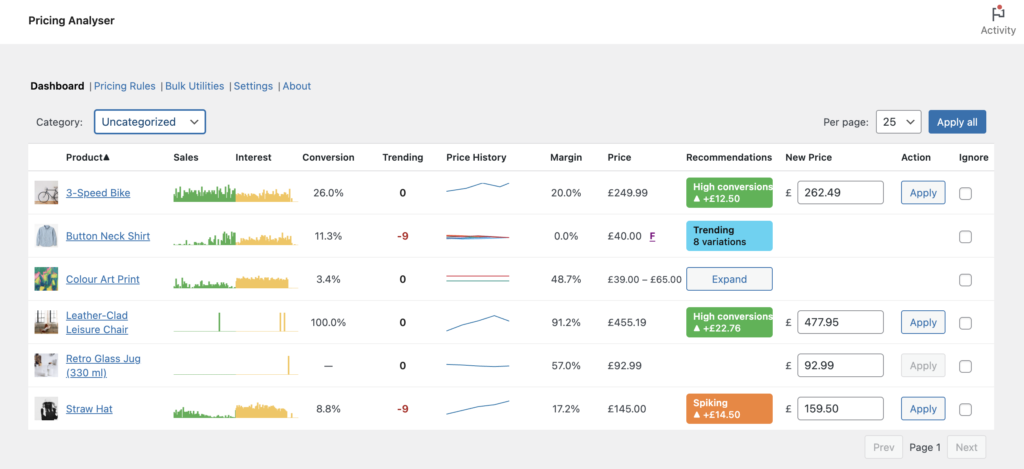
The dashboard brings together:
- sales
- interest
- conversion
- trending
- price history
- current price
- recommendation chips
- suggested new price
Use the category filter if you want to focus on one part of the catalogue first. Your selection here will be retained until you change it.
Interest needs a little explanation. You can basically think of it as product views, but with filtering applied to reduce distortions. For products with variations, Interest is always measured at the product parent level, not at the variation level. Treat it as a general indicator of customer interest in a given product, not as an exact metric.
Step 5: Review recommendations
Look at the coloured recommendation chips in the dashboard.
For any product with a recommendation:
- Click on the coloured chip to open the explanation and see why the rule matched
- inspect the charts if needed
- decide whether to apply the suggested new price
If more than one rule matches a product, you’ll see a count of the number of matched rules (e.g. +2 indicates three matched rules in total). Pricing Analyser highlights the strongest recommendation (measured by the magnitude of the price change). You can inspect the alternatives from the explanation view and swap the active recommendation for any of the others if you so decide.
Don’t expect to see lots of recommendations straightaway. The majority of signals that drive the recommendations require many days of data (up to 60) to trigger a recommendation. An exception is the Sales (24h) signal that uses the most recent 24-hour sales window.
Step 6: Apply a change
The New Price column is populated with the recommended new price. You can apply a recommended change directly from the dashboard via each row’s ‘Apply’ button or by using the ‘Apply All’ button.
You can apply changes one by one at first. Once you are comfortable with the recommendations, you can use bulk actions more confidently. If you decide to use the ‘Apply All’ button, you can filter out individual recommendations using the Ignore toggle at the end of each row. Don’t worry, even if there are many pages of products, only the currently visible recommendations will be applied.
You can also adjust any recommendation before applying it by making a change to the New Price field.
Remember, Pricing Analyser does not autonomously change prices. You must approve or reject the proposed price changes presented on the dashboard.
Step 7: Enable the daily briefing
Back in WooCommerce → Settings → Pricing Analyser, enable the daily briefing email and configure:
- recipients
- briefing generation time
- delivery time
- any category focus you want to apply
The daily briefing is useful once rules are active and pricing recommendations are being generated regularly.
Recommended starting approach
For the best early results:
- start with a few simple rules
- use boundaries on products where margin protection matters
- review recommendations manually before selecting ‘Apply All’
- let the daily briefing highlight exceptions and changes worth reviewing
- be patient – Pricing Analyser needs time to gather data.
Next step
Next, see the Product Edit Screen guide to understand the Pricing Analyser panel added to each product.